
Winter Dog Paw Care: Ice, Salt, Cracks and When Boots Help

Winter paw care is mostly about preventing repeated irritation from ice, salt, deicers and cold surfaces. Dogs vary in tolerance, so the right plan depends on coat, paw condition, walking surface and how long the dog is outside.
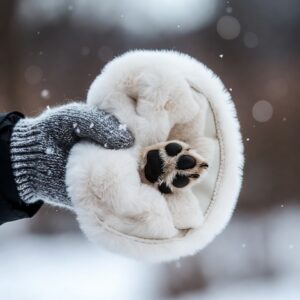
Check paws after every winter walk
Look between the toes and around the pads for ice balls, cuts, redness, chemical residue or tenderness.
Rinse off sidewalk deicers
The AKC winter paw guidance notes that common deicers can irritate paws and may be harmful if licked. Rinse or wipe paws after treated sidewalks and dry them thoroughly.
Boots can help when they fit well
Boots can reduce direct contact with ice and road chemicals, but poor fit can rub or alter gait. Introduce them gradually indoors before expecting a dog to walk comfortably outside.
Trim excess hair carefully
For dogs with long fur between the pads, careful trimming can reduce ice-ball buildup. Do not shave the feet excessively or cut close to the skin.
Paw balms are not magic shields
Some dog-safe waxes or balms can reduce drying and snow buildup, but they do not replace rinsing after chemical exposure or boots in severe conditions.
Shorten the walk when the dog is uncomfortable
Lifting paws repeatedly, limping, slowing down or trying to turn home are signs to stop rather than “push through.”
Cracks and wounds
Deep cracks, bleeding, swelling, persistent limping or suspected chemical burns need veterinary assessment.
Salt exposure can happen after the walk too
Dogs often lick their feet once they are back indoors. If sidewalks were treated, rinse or wipe the paws before the dog settles down to groom. Pay particular attention between the toes, where residue and grit can collect.
Ice balls can pull on hair and skin
Long-coated dogs may develop compacted snow between the pads or around feathering. Remove ice gently with lukewarm water or by letting it soften indoors rather than pulling hard on frozen clumps.
Boot fit should be checked during movement
A boot that looks fine while the dog is standing may twist, rub or slip during a walk. Check the top edge, toes and dewclaw area after the first few minutes. Redness, altered gait or repeated kicking at the boot means the fit or style needs adjustment.
Cold tolerance varies between dogs
A healthy double-coated adult may tolerate conditions that are uncomfortable for a small, thin-coated, elderly or medically fragile dog. Use the dog’s behavior and physical condition rather than one universal temperature cutoff.
Road salt is not the only winter hazard
Sharp ice, frozen crusts, hidden glass, antifreeze spills and chemical deicers can all injure paws or create poisoning risk. Keep dogs away from brightly colored or sweet-smelling liquid around parked vehicles and garages.
Dry cracked pads need gentler walks
Minor dryness may improve with dog-safe paw care and reduced exposure, but deep fissures can be painful and can become infected. Shorten walks and choose softer surfaces until the skin has healed.
Do not use human moisturizers automatically
Products designed for people may contain fragrances or ingredients a dog can ingest by licking. Use a veterinarian-recommended or pet-labeled product when moisturizing is appropriate.
Senior dogs may need extra traction
Ice and packed snow can be difficult for dogs with arthritis, weakness or poor balance. Choose cleared routes, move slowly and consider boots with useful traction if the dog accepts them comfortably.
Inspect nails as well as pads
Snow can hide a split nail or bleeding toe. Check each nail after rough winter walks, especially if the dog suddenly starts licking one foot or limping.
Know when to end the outing
Shivering, repeated paw lifting, slowing, anxiety, limping or trying to head home are useful signals. The goal of a winter walk is safe activity, not proving that the dog can tolerate a certain duration.
Build a simple post-walk paw routine
Keep a towel and bowl of lukewarm water near the door during winter. After walks on treated sidewalks, rinse or wipe each foot, dry between the toes and check for redness or lodged grit. A repeatable routine is more useful than occasional deep cleaning after irritation has already developed.
Introduce boots before snow arrives
Let the dog investigate the boots indoors, reward brief wear and practise walking on a familiar surface. Increase duration gradually. Waiting until a painful icy day to try boots for the first time often creates more resistance.
Rotate and dry wet boots
Damp footwear can rub skin and keep feet cold. If boots are used daily, make sure they dry fully between outings or keep a second pair so moisture is not trapped against the paws.
Watch the dewclaws
Some boots or wraps rub high on the leg where dewclaws sit. Check that area after use and adjust or replace equipment that repeatedly causes redness.
Protect paws during roadside stops too
Travel can expose dogs to heavily salted service areas and car parks. Carry wipes, water and a towel so paw care does not depend on being back at home.
Cold surfaces can be a problem even without snow
Frozen pavement can be uncomfortable for thin-padded or elderly dogs. Shorter routes, warmer times of day and appropriate footwear can help when the dog repeatedly lifts paws despite dry conditions.
Do not ignore persistent licking after winter walks
Repeated licking can signal salt irritation, a cracked pad, a split nail or a foreign body. If one foot becomes more painful than the others, inspect carefully and arrange veterinary care when needed.
Keep winter walks flexible
A route that works on dry snow may be unsuitable after freezing rain or heavy salting. Choose the surface that is safest that day instead of following the same walk out of habit.
Check the whole foot after boot use
Look not only at the pads but also the fur, dewclaws and skin above the boot line. Friction can occur where straps or cuffs repeatedly touch.
Use paw protection as prevention, not permission to overdo exposure
Boots and balm can reduce contact with ice and chemicals, but they do not make severe cold harmless. Shorten the outing when the dog shows discomfort.
Watch for delayed soreness
A dog may finish a walk normally and begin licking or limping later. Recheck the paws once the dog is warm and settled, especially after rough icy surfaces.
Keep winter gear clean
Salt and grit can build up inside boots and on towels. Rinse and dry equipment regularly so protective gear does not become another source of irritation.
Recheck paws after the dog warms up
Cold can temporarily dull sensation. Once indoors, look again for redness, small cuts or tenderness that was not obvious during the walk.
Keep walks shorter during freeze-thaw cycles
Partially melted snow can refreeze into sharp crusts. Softer routes and shorter outings may be more comfortable than pushing through rough surfaces.
Keep a simple note of which surfaces or products repeatedly irritate your dog’s paws so you can avoid the same exposure on future walks.
Dry every paw thoroughly after rinsing so trapped moisture does not add irritation between the toes.
For broader cold-weather planning, see our winter pet care guide. For outdoor hazards beyond winter, use our outdoor dog safety checklist.

0 comments